Let’s say you have a SOAP service provided by a third-party that is very complex, ie: the BPM SOAP service from Oracle that allows you access to the task list for users. You’d like to convert this complex request into a simpler service that removes all the unnecessary parameters and simplifies the output. This is particularly useful if you are servicing mobile applications as you don’t want to burden them with unnecessary options when calling your service. You could also use this as an option to convert the SOAP structure into a REST one (but that’s an article for another day).
With that in mind, let’s create a rudimentary web service to call the BPM SOAP service. As an added bonus will do it in the newly released OSB 12c through JDeveloper. I’m going to use the queryTasks operation provided by the WSDL, but I only want to the end-user to send me the username and password details and I’ll return just the task titles and ids.
The JDeveloper project detailed below is available on GitHub: https://github.com/Joelith/osb12c-simplify-wsdl
Note: You shouldn’t pass the username and password in this manner as the details will be sent in the clear with no encryption. You should use a security policy on the WSDL to control access instead (we covered that in a previous post). But for simplicity sake let’s continue.
Schema
First (after creating our Service Bus Application and Project in JDeveloper) we need to define the xml response that we want to return. I just want the title and taskId, so here’s my schema. Create this in a ‘Schemas’ folder in JDeveloper (Note: when I did this in JDeveloper it kept wanting to put it inside the .data folder and thus hide it from my project explorer. Make sure the ‘Directory’ setting is correct!)
<?xml version="1.0" encoding="windows-1252" ?>
<xsd:schema xmlns:xsd="http://www.w3.org/2001/XMLSchema" xmlns="http://www.example.org/TaskListResponse"
            targetNamespace="http://www.example.org/TaskListResponse" elementFormDefault="qualified">
  <xsd:element name="taskListResponse">
    <xsd:annotation>
      <xsd:documentation>A sample element</xsd:documentation>
    </xsd:annotation>
    <xsd:complexType>
      <xsd:sequence>
        <xsd:element name="task" maxOccurs="unbounded" minOccurs="0">
          <xsd:complexType>
            <xsd:sequence>
              <xsd:element name="title" type="xsd:string"/>
              <xsd:element name="taskId" type="xsd:string"/>
            </xsd:sequence>
          </xsd:complexType>
        </xsd:element>
      </xsd:sequence>
    </xsd:complexType>
  </xsd:element>
</xsd:schema>
Our WSDL
Now let’s create the WSDL that will define our simple service. Right click your project and select ‘New’->’From Gallery’. Search for WSDL or find it in under the Business Tier/Web Services category. Give it a name, make sure it’s in the right directory and press ‘Ok’. Don’t create a port type at this moment.

Now let’s create the request and response messages for our operation.
- On the Design tab, expand the Messages group (if it’s not already) and press the ‘+’ button
- Call it’s myTasksRequest
- Create another called myTasksResponse
- Right click the myTasksRequest message and select ‘Insert inside message’->’part -‘
- Part Name: username
- Reference Type: type
- Reference Value: xsd:string
- Repeat for a part called ‘password’
- Before we can add the parts for the myTasksResponse we need to import the schema we created earlier.
- Change to the Schema tab
- Right click ‘<types>’ and choose ‘Insert Inside types’->’schema’
- Right click that schema and choose ‘Insert Inside schema’->’import’
- On the properties tab set the following:
- schemaLocation: ../Schemas/TaskListResponse.xsd
- namespace: http://www.example.org/TaskListResponse
- Go to the source page and add ‘xmlns:taskList=”http://www.example.org/TaskListResponse’ in the definitions node (not sure how to do this via the GUI, so just do it here)
- Your schema page should look like this:

- Now we can add the part for myTasksResponse. Right click myTasksResponse and select ‘Insert inside message’->’part’.
- Part name: taskList
- Reference Type: element
- Reference Value: taskList:taskListResponse
Our WSDL now has the request and response messages, it should look like this:

Now, let’s add the port types and bindings so we can actually use this.
- Click ‘+’ button on the Port Types group
- Call it ‘SimpleTaskServicePort’
- Right click it and select ‘Insert Inside port’->’operation’. Set the following:
- Operation Name: getMyTasks
- Operation Type: Request Response
- Input: tns:myTasksRequest
- Output: tns:myTasksResponse
- Don’t worry about adding a fault at this time
- Click the ‘+’ button on the Bindings/Partner Link Types group
- Leave the Port Type as the default
- In the SOAP11 section change the ‘Message Encoding’ to Rpc/Literal
Your Design tab should now look like this:

Pipeline
Now we are going to create our pipeline to connect to the remote BPM service and expose it through the WSDL we just created.
- Get the remote WSDL by going to File->Import->Service Bus Resources.
- Choose ‘Resource from URL’
- Add the Source URL (http://<soa-server>:<soa-port>/integration/services/TaskQueryService/TaskQueryService?wsdl) and check the name. Accept the defaults after tha
- Create a Business Service by right clicking your project and choosing ‘New’->’Business Service’
- Service Name: BPM_TaskQueryService
- WSDL: Click ‘Browse WSDLs’ and choose the wsdl we downloaded above. Make sure it selects the correct binding (taskQueryService:TaskQueryServiceSOAPBinding)
- Now open the composite for your project and right click in the pipeline section and choose ‘Insert’->’Pipeline’
- Give it a name (eg: GetMyTasksPipeline)
- On the second page, choose the WSDL we created earlier
- Ensure that ‘Expose as a Proxy Service’ is checked and set the proxy name (eg: GetMyTasksProxyService)
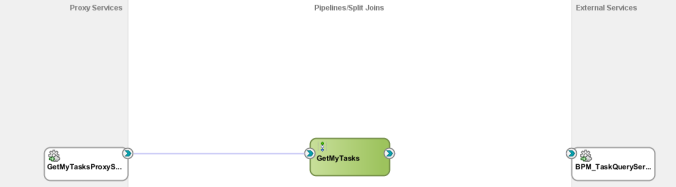
- Your service should look this:
Finally, let’s add the detail for our pipeline.
- Double click the green pipeline
- Drag a ‘Pipeline Pair’ under the first box
- Drag a ‘Service Callout’ to the ‘Request Pipeline’ stage
- In that Service Callout drag an ‘Assign’ to the request pipeline and a ‘Replace’ to the response pipeline
- Drag a ‘Replace’ to the Response Pipeline of the Pipeline Pair.
- Your pipeline should look like this:

XSL Mappings
All we have to do now is to provide the details in the assign and request pipelines. In those we are going to be mapping request from our WSDL to the correct request for the remote service and then mapping that services response back into the response we need for our service. To do the mapping from our input parameters to the request object required by the BPM API we use an XSLT transform.
- Right click your project and select ‘New’->’XSL Map’
- File Name: Input_Params_to_TQS_TaskListQuery.xsl’
- Uncheck ‘Use Source Schema(s)’ as we aren’t mapping from a schema, just the parameters in the WSDL
- In the additional sources tab click the ‘+’ button
- Local Name: username
- Schema: No schema
- Repeat for a parameter called ‘password’
- For the target schema, click browse and then click browse under ‘Select Schema’
- When you added the remote WSDL the system will have downloaded all the related schemas for the service. Unfortunately, OSB renames all these to be nonsensical numbers, so find the one that contains the taskListRequest object. Mine was called XMLSchema_-210786719.xsd

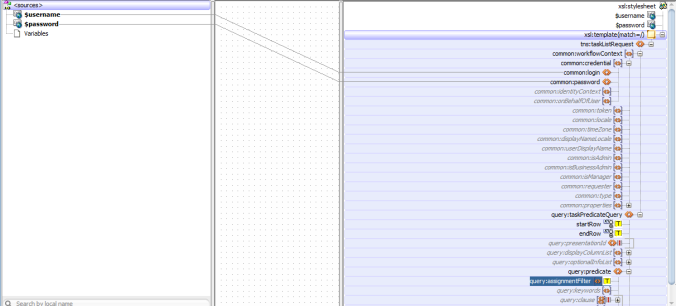
This will open up the XSL mapping GUI. We need to drag the parameters on the left to where we want them to map to on the right.
- Drag ‘username’ to tns:taskListRequest/common:workflowContext/common:credential/common:login
- Drag ‘password’ to tns:taskListRequest/common:workflowContext/common:credential/common:password
- Right click tns:taskListRequest/query:taskPredicateQuery/startRow and select ‘Edit Text Value’. Set it to 1
- Right click tns:taskListRequest/query:taskPredicateQuery/endRow and select ‘Edit Text Value’. Set it to 10
- Right click tns:taskListRequest/query:taskPredicateQuery/query:predicate/query:assignmentFilter and select ‘Edit Text Value’. Set it to “All” (no quotes)
Let’s do the same for mapping the BPM API response to our flattened response.
- Right click your project and select ‘New’->’XSL Map’
- File Name: TQS_TaskListResponse_to_Simple_TaskListResponse.xsl
- For the Source schema, choose the XML Schema that you chose as the target schema in the first XSL, but select the taskListResponse object
- For the Target schema, choose the schema you created at the beginning of this document
In the mapping GUI drag the task:task object on the left to the tns:task object on the right. Accept the defaults of the auto-mapper. Then drag task:task/task:systemAttributes/task:taskId to tns:task/tns:taskId. It should look like this:

Final Steps
Now back to our pipeline to finish this off!
- Click the ‘Service Callout’ and in the properties change the following:
- Choose ‘queryTasks’ as the Operation
- Select ‘Configure Payload document’
- Request-Payload: taskListRequest (this will use the set the payload to the contents of the taskListRequest variable, which we will create later)
- Response-Payload: taskListResponse (this will set the response of the service call to the taskListResponse variable)

- Click the ‘Assign’ in the Request Action of the Service Callout
- Set the Variable to taskListRequest
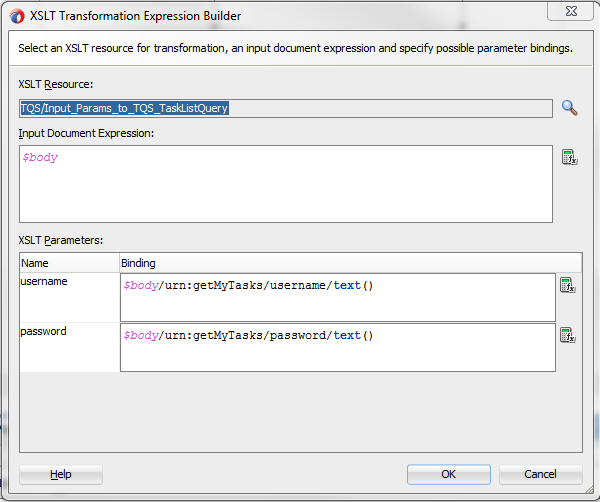
- Click the ‘fx’ button next to the Value attribute and select ‘XSLT resources’
- In this window, set the XSLT resource to the ‘Input_Params_to_TQS_TaskListQuery’ XSLT we created earlier
- Set the Input Document Expression to $body
- For the username parameter set the binding to ‘$body/urn:getMyTasks/username/text()’
- For the password parameter set the binding to ‘$body/urn:getMyTasks/password/text()’

- Click the ‘Replace’ in the Response Action of the Service Callout
- Set the Location to taskListResponse
- Set the Replace Option to ‘Replace entire node’
- Click the ‘fx’ button next to the Value attribute and select ‘XSLT resources’
- In this window, set the XSLT resource to the ‘TQS_TaskListResponse_to_Simple_TaskListResponse’ XSLT we created earlier
- Set the Input Document Expression to $taskListResponse

- Click the ‘Replace’ in the Response Pipeline
- Set the Location to body
- Set the Replace Option ‘Replace node contents’
- Set the Value to $taskListResponse

After all that we are done! Just to deploy to your OSB server and then open it in the test console
Testing
The sbconsole from 11g has been replaced so to test this in 12c just go to Enterprise Manager (http://<domain>:<wls_port>/em) and then open ‘SOA->service_bus’. Your deployed project should be visible. Click the service defined and then the test button. Input some valid params and we should get the following response:

